Friday 31 August 2012

An Oganised Kitchen

The kitchen is the heart of the home. Its where we cook, where we eat, where the family pet eats, the kids do their homework, where unexpected visitors sit for a chat. So, naturally with all these things taking place on a daily basis it can the messiest room of the house. With the kids going back to school and a new season nearly upon us you maybe thinking of re-organising your kitchen in order to make this part of your life run a little bit smoother. I find I work much better in my kitchen when its tidy and everything is in its place, easy to find and at hands reach. I like to have utensils and ingredients in front of me so just at a glance I can find them easily....but I don't like clutter.

Tips for a more organised kitchen:

Cooking - Around your range/hob place your utensils in a holder or from hooks and your pots and pans in a cabinet directly beside the cooker or from a hanging utensil holder - only keep out the items you use on a daily basis.

Ingredients - Arrange ingredients such as baking ingredients in their own cabinet. Use see through plastic containers for small items such as sprinkles and decorations. This keeps them together and easy to find.

Daily Ingredients - Ingredients you use on a daily basis can be left on your worktop or around you cooking area. Eg eggs in an egg basket. Salt, pepper cooking oil on a little shelf beside your cooker

Mini Kitchen Office - Multitasking is the norm in many kitchens so make it as easy as possible. While cooking you want to take note of an ingredient you are running low on. A blackboard on the wall is great for jotting down notes or a memo board for holding the receipt of an item you need to return or for holding the family appointment cards. So the next time someone is asking you, while your doing the washing or cooking or cleaning, what time is my dentist appointment or telling you we need more ketchup...you can point them in the direction of the mini kitchen office.


You have to love this kitchen. Everything is on the worktop...utensils, egg holder, teapots...yet its not cluttered looking due to no overhead presses
Create a little kitchen office by hanging a blackboard, memo board and a basket or two for holding pens and odd bits and pieces


I love the hanging racks for your pots and pans in these kitchens and also hooks on the walls beside the cooking area for your utensils
 
 
Here are a small selection of items available at www.dressmyhome.ie that will help you organise your kitchen. There are loads more in different colours sizes etc so check out our website and make sure to follow us on facebook for regular 'Get The Look' ideas and updates on new products


Thursday 9 August 2012

Giving an old stool a new lease of life


Those of you that have been following my blog may remember I mentioned in an earlier blog a stool I got from my Mother in Laws Garage with the intention of painting it....Well I finally got round to doing it and am very excited to be sharing the before and after pictures.....


What do you think?? I love it!!
I used a dulux satinwood paint which I got mixed from the dulux colour card. Its called blue diamond 6. I gave it a light sanding and a couple of coats of paint and voila!!

Doing things like this will not cost you a fortune and you will have a unique piece of furniture in your home. Once you start you'll never look at an old piece of furniture again as junk. Have a look on donedeal or go to any local auctions. They are great to pick up odd bits and pieces that you can make your own and match with your other furniture id desired....although the trend at the moment is individual colours.Here are some more images to give you inspiration on revamping your old furniture.


Until next time,


Wednesday 27 June 2012

Anyone For Some Elderflower Cordial?

I remember years ago there was always a big elderflower tree in our garden. There are actually loads of them scattered around my Fathers farm and on the roadsides but I always remember this one in particular. And I remember being told by my Mother about Elder trees and how the flowers and the berries (berries follow later in the year) could be used to make drinks and jams.......I dont think I ever tasted elderberry jam or remember it being made....probably because my Mother was so busy making Rhubarb & Ginger jam, which we had an abundance of...and other fruits such as blackcurrants and apples.

I was curious about elderflower cordial so I looked up a recipe and headed home on Monday evening to pick myself a bag of elderflowers. And what a lovely way to spend a couple of hours on a summers evening. There are masses of elderflower out at this time of year so I had no problem filling a bag.


I found the following recipe on the Slow Food Ireland website, which is taken from Hugh Fearnley Whittingstalls 'The River Cottage' cookbook

20-30 freshly picked heads of Elderflower,
Just boiled water
Zest of 2 Lemons and 1 Orange,
200ml or freshly squeezed lemon juice and up to 1.5kg Caster Sugar

Other equipment needed.
Bowl, grater, large saucepan, meauring jug, muslin cloth, bottles

Method:
Shake off any insects and place the flowers in the bowl with the zest, and pour over enough just boiled water to cover them completely

I ended up with 3 bowls of approx 30 elderflower heads in each bowl

Elderflowers and zest of lemons and orange covered with water.


I left these overnight and strained all into a large saucepan using a muslin cloth (got this from local drapery at €3 per/yd)
 Place your saucepan over the heat and for every 500ml of liquid add 350g of caster sugar and 50ml of fresh lemon juice


Slowly heat the liquid allowing the sugar to dissolve.
Let it simmer for a short while and remove any scum that collects at the top.
Remove from the heat and allow to cool enough to strain again and then transfer to your bottles.

I transfered it to my vintage style swing top bottles as I will be giving it as presents but you can also place in plastic bottles and freeze. If using glass bottles, wash them out and place in a hot over to sterilise. Your cordial will last longer.

AND VOILA!! THE FINISHED PRODUCT!!
Serve approx 1 part cordial to 5/6 parts sparkling water. You can also use still water but I prefer sparkling. This is a lovely refreshing and healty drink with no colours, preservatives or additives. What more could you ask for and its so simple to make. I ended up with 6 litres so we'll be drinking it for a while. Please feel free to ask me any questions on making it. I would also love to hear from anyone who has made it before. I'm very happy with how it turned out but there's always room for improvement so all tips welcome.

If your looking for bottles to store your cordial, I have a selection of swing top vintage style bottles on my website for sale. Check them out here


Some interesting health benefits of Elderflower Cordial
Nearly all herbal books refer to the elder as “the medicine chest of the country folk”. Amongst the claims found in a number of herbal and historical references (refer to any herbal history/encyclopaedia) are the following:
  • Traditionally used as a de-tox, to build the immune system by clearing toxins thru the lymph glands.
  • For respiratory problems, elderflower was used to treat asthmatics in the days before “modern” medication; and as an expectorant to clear catarrh.
  • To build up “poorly” people (especially children and the elderly) before winter – as coughs and colds and influenza were killers through a cold European winter.
  • In spring, elderflower concentrate, also known as elderflower cordial, was used to relieve the symptoms of allergies to pollens etc; to reduce the effects of sinusitis.
  • Elderflower tea was used as a blood purifier; and as a tonic or ointment to fade freckles or skin blemishes. Many modern skin tonics still contain elderflowers.


Monday 28 May 2012

Add a bit of shabby chic to your home

Shabby chic is a very popular style but what is shabby chic?
It is a form of interior design that uses different elements to give a room a distressed romantic soft layered look and generally uses a lot of whites with soft pastel colours introduced in the form of painted furniture, laces and linen and anything with roses. Especially peony roses.

The following materials are the essence of shabby chic

  • Vintage delph i.e cups and saucers, vases, serving bowls etc
  • Laces & Linen - table clothes, cushions, bedspreads influenced by french tioles and Victorian linen and laces
  • Distressed furniture - painted furniture with several layers of paint worn at the edges.
  • Florals - introduced in pictures, delph, accessories, cushions, bedspreads etc
The term shabby chic was supposed to be coined by 'The world of interiors magazines' back in the 80's and became very popular in the US in the 1990's. I remember the first time I saw shabby chic was when Pamela Anderson's home was featured on MTV's Cribs series what must be 10 years ago. I have to say I was not that impressed with it at the time as her home was just jam packed and just cluttered which is off putting no matter what style your home is. I think the whole shabby chic look has calmed down a bit these days and is much more elegant. If you are like me you will probably have elements of different styles in your home and in my opinion I don't think anyone has just one style they follow. If you look around your home you probably have some shabby chic, some country kitchen, some contemporary etc.

Here are some images of shabby chic rooms and ways of adding the shabby chic look to your home while blending it in with what you already have.

 Florals especially peony roses are a hugh part of the shabby chic look. Add a few to your kitchen or any room in your home.
 Vintage delph I'm glad to say is the in thing now so search your Mothers or Grandmothers Cupboards and borrow a few bits. Even something as simple as this can add the shabby chic look to a table or shelf
 Toile is very much a part of the shabby chic look but too much can be overpowering. I like the way it is done in this bedroom with just one wall papered and blended together with the curtains and oxford pillow shams...oh and of course the lovely blue wardrobe

 Get the shabby chic look in your garden by adding some layered tablecloths to your table and cushions cushions cushions....
 As I said above the shabby chic look uses a lot of white and this is an excellent example of a shabby chic bedroom.
 Painted furniture is essential to achieve the shabby chic look. This little table is painted in a pale blue and has the distressed look around the edges with a cute drawer handle added to add the chic to the shabby 
 A little girls room is where you could really go over the top with the shabby chic look and what other room deserves it more. It's such a feminine look and perfect for a little girls room.
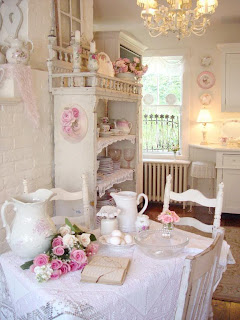
 A shabby chic style kitchen that in my opinion has a bit too much going on but again it shows the essence of shabby chic. Roses, laces, vintage delph, whites, soft romantic feminine look.
 I would prefer this shabby chic style kitchen. Nice pastels colours, bright and inviting.
 Add shabby chic to your kitchen by adding some open shelves and placing some odd vintage delph on them.
A shabby chic bedroom using florals and pastel colours.


At DressMyHome we have loads of accessories that will help you achieve the shabby chic look. Here are a few of them. For more information on these products and to view more items go to http://www.dressmyhome.ie/shabby-chic-accessories.html?limit=all

Pauline:)